We moved into our house just over a year ago now, and part of the agreement with the builder, is that they come out at 3 months and 1 year to inspect and fix things. At the one year walk-through, the builder goes through the entire house to find any drywall issues; that means, nail pops, drywall seams, settling cracks, etc. The drywall workers were here for two days, and we haven’t seen the painters yet. I have been waiting for weeks since the inspection to paint anything, because I knew I’d have to re-paint as soon as the workers left.
I have refrained from doing too much painting around the house since the workers have left, but I haven’t been able to completely keep away from the paint rollers. Our upstairs hallway has simply been a boring route for us to get from one place to another. Seeing as this is the hall that leads to little man’s room, bathroom, and the guest bedroom, I wanted to make it lively, while keeping with the feel of the home.
To get started painting the striped hallway, I measured the wall from the top of the baseboard to the ceiling. I then divided that height by the size I thought I would want the stripes to be. In this case, I got six stripes {3 of each color} that were 16 inches each. To mark the tape lines, I measured 16 inches up, made a small pencil mark, and then – using the level – drew a pencil line all the way down the wall. In my opinion, this is the easiest way to get straight lines without having to deal with getting rid of marks on the wall later.
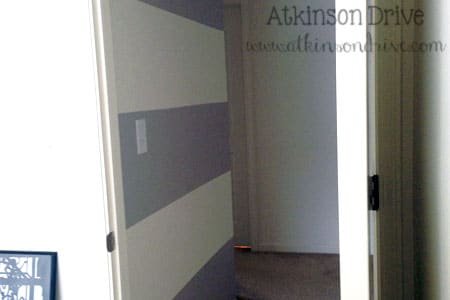
This is a pretty straight-forward project, but some attention must be paid to taping. In the photo above, you might notice how one of the stripes appears smaller than the stripe above it. The seemingly smaller stripes are the ones that will be staying white. The key is to tape off the stripes that are to be painted. Make sure the pencil lines are just inside the tape so you paint over them.
If you want perfectly crisp stripes, follow the instructions found here.
When painting stripes, I like to use a small doors & cabinets painting kit. There is usually one 4″ foam roller and a plastic paint tray included. Of course, you can always use a regular-size paint roller, but these tend to be easier for clean-up purposes.
For these stripes, I used Dutch Boy DuraClean in Sherwin William’s “Grayish”. It’s a light and fresh gray that goes well with the “Dover White” already in our home.
The wide stripes are perfect for this space. They add a touch of whimsy, without overwhelming the space with pattern. I wanted to make sure not to go too crazy because of the painted chevrons in little man’s room, which can be seen from the hallway.
This is the view from our guest room into the hallway. Little man’s room is to the right, and just past that is the linen closet {which you can see from the photo above this}.
This photo was taken from the bathroom looking back to little man’s bedroom and the guest room.
There are more plans on my checklist to spruce up this space, but I am genuinely enjoying the stripes!













 Loading...
























Pretty please don’t take this the wrong way. I love your blog design, and I’ve noticed you’ve been tweaking a little, and it looks lovely. I loved this post, but I was very distracted by the font that you are using. It reads as all caps…which most folks interpret as “yelling” online. I think that you could get away with this font in the title and sidebar, but you may want to look into a different font for the body of your post. If you don’t agree, feel free to delete this comment and do what you want to do. I just wanted you to be aware that it may be detracting from your content. I know I would want to know if something was distracting on my site. Keep creating…I love the stripes
Thanks for the comment! I have been struggling with whether or not to change it. :-)
I definitely love stripes in a hallway, and you paint choice is just lovely
Your wall turned out so very lovely! I love striped walls and I love the color you used!
Selene @ restorationbeauty.com
stripes never disappoint!
This is a really, really great project! Horizontal stripes through a hallway is unexpected but so pretty and the color is perfection. Beautiful!
I’m so glad you like it! I am in love, but I’m a little biased :-)
The stripes are unexpected and add a lot to the wonky ish wall. I don’t think I’d have the patience to tape the lines so straight :)
I absolutely love it. Great job! I host a DIY link party every Monday and would love for you to join! http://homecomingmn.blogspot.com/2013/02/the-diyers-link-party.html
Your hallways turned out fabulous! You can never go wrong with stripes!! Would love for you to share at the party! xo bridgett
I LOVE the way it turned out! The stripes are awesome! I love the color as well. Thanks so much for sharing at Thursday’s Temptation. I am going to be featuring your hallway at tonights link party!
Jill
Love the stripes may use it in a room!! Thanks for linking up to Artsy Corner:)
Great minds think alike! I just recently painted my hallway Lazy Gray by Sherwin Williams…check it out!
http://thehousemadehome.blogspot.com/2013/02/a-wall-earns-its-stripes.html
Fun stripes! You did a great job! Thank you for sharing at Rustic Restorations Weekend!
The stripes look so good!
I have a weekend Link party if you’d care to join:
http://www.bobijensen.com
Thanks so much for linking up thsi great tutorial to Monday Funday! I am featuring you today so please stop by and grab a featured button! xoxo – Cheryl
http://www.thatswhatchesaid.net/2013/diy-home-ideas/
Thank you so much for the feature! :-)